
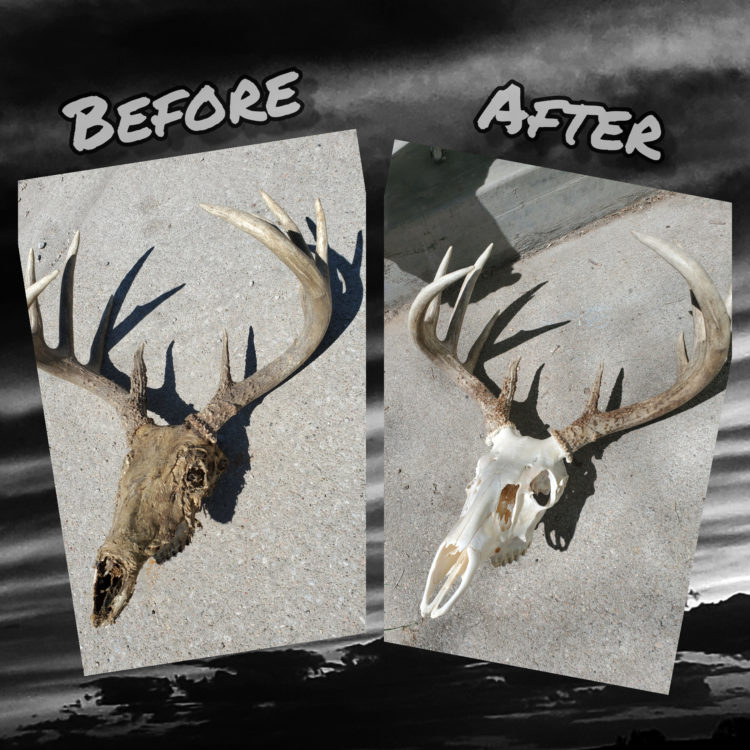

I have to give credit where credit is due! Click the photo and see where I learned how to do my own European skull mount. This awesome website describes the process very well. Below is my own experience with following along from the article. Enjoy!
STEP 1: Prepare the skull – if possible
Let’s say you shoot a buck and decide to do a European skull mount. The first thing you want to do is prepare the head as quickly as possible (at least within a few days). To properly prepare it, simply cut off the head, remove the hide and cut off as much meat and tissue as you can. You really don’t need much more than a sharp knife and I recommend using some rubber gloves. It will get gross, especially when you cut out the eyeballs and brains, but it’s just something you got to do! The key here is to do this when the deer has been freshly killed, before the hide and meat begin to harden around the skull. Once you’ve finished this, you can go on to step 2 anytime after, even years later!
Now, if you did not get the luxury of preparing the skull, don’t worry! Sometimes you can’t find the time, or perhaps you want to restore a dead head you found out shed hunting. If this is the case, simply go right to step 2 and begin the process. You just may have to work a little harder during the boiling and scraping section to achieve the same results.
STEP 2: Gather your equipment
The tools you will need for this process really are nothing fancy. The following list is everything I use, but keep in mind that other things will work just as well.

- Burner with a heating source (such as a turkey fryer with propane)
- A large pot that can hold about 5 gallons of water (again, similar to a turkey frying setup)
- Ignition source such as a torch
- A gallon container to measure the water
- Scraping tools (screw driver, pliers, hammer, paint scraper, pocket knife, etc.)
- Washing Soda (found in the laundry section at the store)
- measuring cup (1/2 cup)
- Power washer (a regular hose with a jet nozzle may work as well)
- Fire extinguisher (just in case)
- Hydrogen peroxide (found in the pharmacy section at the store)
- Container to soak the skull in
STEP 3: Fill the pot and mix in washing soda

This step is pretty straight forward, just mix in 1/2 cup of washing soda to each gallon of water. I place the head in the pot then fill it up until the skull is completely submerged. If the base of the antlers are sitting in the water, that is completely fine. Once the amount of water needed is rounded off to the nearest half gallon, I remove the head and pour in the washing soda. The kids like this part because they get a stick and stir up the “witch’s brew.” Once the solution is mixed well, add the head back in and move on to step 4.
STEP 4: Boil, scrape, and powerwash

This step is where the magic starts to happen! Light the flame and place the filled pot on the burner. The initial boiling sequence takes the longest since the water from the hose is usually quite cold. I crank the fire up as high as it will go and just keep an eye on it. With my setup, I never make it to a rolling boil because the foam will overflow before then. Once I see it rising up, I lower the heat and keep it in this zone where the steam is slowly releasing from the top. At this point I’ll keep the head in for 20 to 30 minutes before removing it.

Once you take it out, use your tools to remove any larger pieces of hide or tissue. Pliers, a pocket knife, even a flat head screw driver have worked just fine for me. Then I hit it with the power washer. Be careful when you’re spraying the softer bones around the nasal cavity, they’ll get blown to pieces if you’re too close with the nozzle. On the harder parts of the skull, I put the nozzle as close as possible to remove the gunk. My electric power washer is 1600 psi, so just learn the power of your own machine and adjust accordingly. Also, it is a great idea to wear glasses and perhaps a face shield in this step. Sometimes you just can’t control where those pieces will fly!
After picking and power washing the skull, repeat this process again. I have read that boiling for too long will weaken the nasal bones and the teeth may begin to fall out. I typically do 3 rounds of boiling, scraping, and washing and have avoided this issue. Once this is complete, move on to the next step.
STEP 5: Soak in hydrogen peroxide
Now it’s time to soak the skull and get that nice white color we’re after. Place the head in your Tupperware, plastic container or whatever you got and fill it with hydrogen peroxide. Depending on the size of your container, it will probably take 3 to 5 small bottles to fill it.
It’s almost guaranteed that the top part of the skull will be sticking out of the solution. A trick I learned is to get a wash cloth and place it over this area. Fit the cloth snugly underneath the antlers around the pedicles and make sure this stays moist for the entire soaking period.
Take extra caution to not get the hydrogen peroxide on the actual antlers, it will bleach them. Accidents happen though so if you dip them or splash them, rinse it off with regular water as best you can. Also, avoid touching the solution with your bare skin, it may be a little uncomfortable! Allow the skull to soak in the hydrogen peroxide for 1-2 days before removing.

Cover skull with hydrogen peroxide 
Stop at the base of the antlers 
Use a rag to cover the exposed area of the skull
STEP 6: Dry and display your mount
After a day or two has passed from step 5, go ahead and remove your skull from the container. At first, you may be alarmed that the hydrogen peroxide didn’t work, but just be patient! Often it will come out of the solution with a yellow tint to it, but don’t worry, the real magic is about to begin. Set your skull to dry outside in the sun. Within a couple of hours the skull will turn a bleach white color, and wallah, you completed your first European skull mount!
If you plan to do more heads soon, I recommend reusing the same hydrogen peroxide. I don’t know the actual number of uses you can get, but I did do 3 skulls over a period of 2 full weeks and they all came out amazing. If this is your only one then you can simply discard the solution.
The only thing you have left to do now is to show off your work! There are a lot of creative ways to display these types of mounts. Scour through the internet, get some ideas, and see what you can make happen. If you just want a simple bracket to hang it up on the wall, some cheap but good ones can be found here.
Have fun
This whole process is a great way to spend quality time with the family and learn something new. Start to finish, this may take a few hours, so invite some family and friends over to enjoy the day! Below is a European skull mount video from beginning to end of an old dead head I found. If you find something valuable in this step by step process, let me know your experience in the comments below.